FileMaker Cloud Help
Introducing FileMaker Cloud
What is FileMaker Cloud?
FileMaker Cloud provides reliable access to your database solutions (custom apps) that use FileMaker Pro, FileMaker Go, and FileMaker WebDirect. Your data is managed by FileMaker Cloud and hosted through Amazon Web Services (AWS). FileMaker Cloud is offered by Orbitera on AWS Marketplace.
FileMaker Cloud hardware and software requirements are listed here:
FileMaker Cloud Technical Specifications.
FileMaker Cloud technical overview
FileMaker Cloud uses Apache HTTP server as an access point. FileMaker Cloud Admin Console is the user interface that allows users to monitor and administer their instance. Instance-related data from AWS and FileMaker-related data from the FileMaker Data API is sent to Admin Console through the FileMaker Cloud web server.
FileMaker WebDirect
(web browser)
FileMaker Pro or FileMaker Go
FileMaker network protocol
FileMaker Cloud Admin Console
(web browser)
Web services
FileMaker Cloud
back-office services
Web publishing core
Apache web server
FileMaker Database Server
Web services
FileMaker Cloud web server
FileMaker Cloud virtual DBA bot
Amazon Web Services (AWS)
FileMaker Cloud uses these Amazon Web Services:
- Elastic Cloud Compute (EC2) provides scalable computing capacity
- Elastic Block Storage (EBS) provides persistent storage volumes for your data
- Simple Storage Service (S3) stores Amazon Machine Images (AMIs), used to launch EC2 instances; S3 also stores snapshots (backup copies) of data volumes
- Simple Email Service (SES) provides a platform for sending email notifications
- CloudFormation provides a template for provisioning AWS resources needed to create an EC2 instance
Monitoring and managing instances
After you create and set up your FileMaker Cloud instance, you use FileMaker Cloud Admin Console to monitor and manage your instance. There are two main types of tasks:
- FileMaker Cloud instance-related tasks, such as upgrading the storage volume size
- FileMaker data-related tasks, such as preserving backups or downloading databases
About FileMaker Cloud users
FileMaker Cloud users are server administrators. There are two types of FileMaker Cloud administrators: root and non-root.
- The root administrator creates the FileMaker Cloud instance and has full access privileges. As the instance creator, the root administrator receives all FileMaker Cloud emails. The root administrator invites other users to be non-root administrators.
- Non-root administrators are authenticated with Amazon credentials and have limited privileges. They can work with FileMaker Pro databases and backups, upgrade or refresh the FileMaker Cloud instance, and receive system notification emails. Non-root administrators do not have access to FileMaker Cloud opt-in registration.
Note: FileMaker Cloud does not permit guest account access.
There are also FileMaker client users, which you see on the Databases page of FileMaker Cloud. These users are connected to hosted databases via FileMaker Pro, FileMaker Go, or FileMaker WebDirect User Connections licenses.
Navigating FileMaker Cloud
Viewing the system summary
When you sign in to FileMaker Cloud, you see the Dashboard, which provides a summary view of your system. The Dashboard also contains a set of tabbed pages for you to navigate as you administer FileMaker Cloud and database connections: Databases, Backups, Configuration, and Subscription.
Note: If you plan to use a custom signed SSL certificate, perform that configuration task first. See Importing SSL certificates.
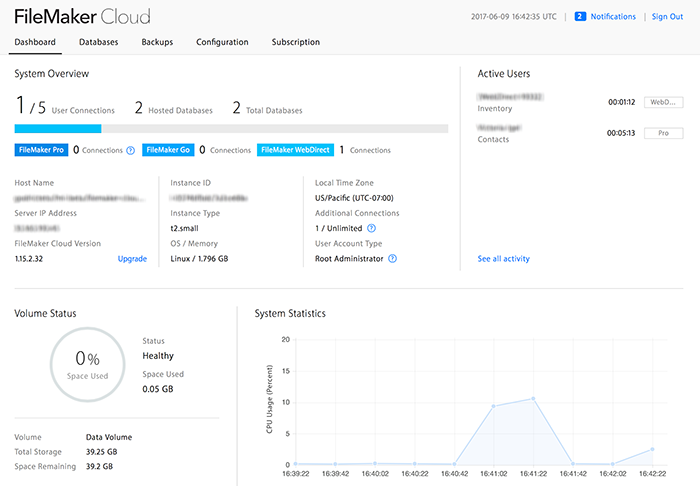
The Dashboard shows information about:
- your FileMaker Cloud AWS instance
- available and in-use connections to FileMaker Cloud
These can be FileMaker Pro (for User Connections), FileMaker Go, or FileMaker WebDirect client connections. The Additional Connections field shows FileMaker Pro or FileMaker Pro Advanced computer licenses, which are not included in the User Connections count.
- hosted (open) and total databases
- active users (currently connected to FileMaker clients)
- data volume status
- CPU and memory usage, and network throughput; this data updates every 20 seconds
The upper right of the Dashboard shows the FileMaker Cloud server time in Coordinated Universal Time (UTC). This time is offset from the local time zone that you selected when you set up the instance.
Next to the UTC time, the Notifications drop-down list shows important events for you to respond to, such as warnings on data volume or memory usage, or patch applications.
Upgrading FileMaker Cloud
When a new software version or patch is available, you see an Upgrade link or a notification in FileMaker Cloud Admin Console. Always keep your software up-to-date.
Clicking the Upgrade link displays a confirmation dialog box. When you upgrade from one FileMaker platform version to the next (for example, from FileMaker Cloud 1.15.2 to 1.16.0), you see a message that you must also upgrade your licensed FileMaker client software, such as FileMaker Pro or FileMaker Go.
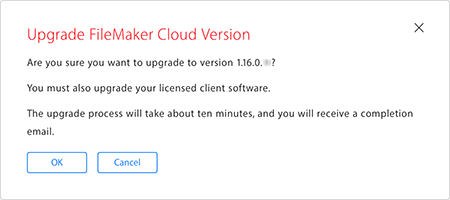
Note: FileMaker Cloud 16 (available in October 2017) will only be compatible with FileMaker 16 clients.
Working with databases and clients
In FileMaker Cloud, click the Databases tab to view, sort, and search uploaded databases. Click the down arrow to the right of the databases list to open, pause, resume, close, and remove databases.
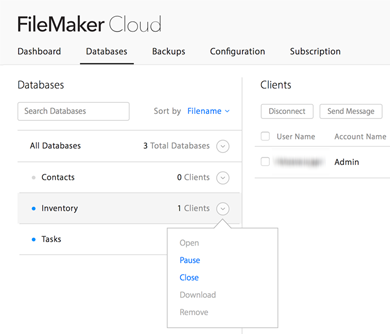
You can also manage clients connected to the databases, and send messages to client users (for example, if you are going to pause the database they are connected to).
Encrypting and uploading database files
In FileMaker Cloud, all database files require an encryption password to open them. You must enter an encryption password when you open the file in FileMaker Cloud.
If you use FileMaker Pro Advanced, you can encrypt a database file with a password, upload the database to FileMaker Cloud, and enter the previously created encryption password when you open the database.
If you use FileMaker Pro or FileMaker Pro Advanced, you can upload a database file that is protected with a password, and create an encryption password prior to opening the database. The password must have from 8 to 128 characters and include 3 of these 4 character types: uppercase letter, lowercase letter, number, and symbol.
Note: Only database files with password protection can be opened on FileMaker Cloud.
You must know the FileMaker Cloud administrator user name, which is an email address, and password to upload a database file.
To upload and open a database file:
- In FileMaker Pro or FileMaker Pro Advanced, choose File > Sharing > Upload to FileMaker Server.
- Select the FileMaker Cloud host name.
If that name isn't listed, enter the host name or IP address. - Enter the administrator user name and password.
- Browse to navigate to the file or files, and click Upload.
If the files have not been encrypted in FileMaker Pro Advanced, the Automatically open databases (on server) after upload option has no effect. - After the upload completion message appears, on the FileMaker Cloud Databases tab, click the right arrow next to the database and choose Open.
- Enter or create an encryption password.
You can save the password by selecting the Save password checkbox.
Notes:
- If you do not save the password and you choose to open all databases, databases without the saved password will not open.
- Files are always uploaded to the default folder.
Working with backups
In FileMaker Cloud, click the Backups tab to view, preserve, and label backups. A backup is a snapshot of your storage volume, which contains all your data, including databases, configurations, and logs. On the Backups page, you can also attach a snapshot to your instance, so you can download database files from the snapshot.
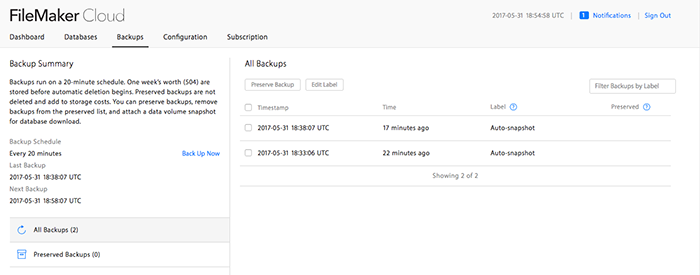
Note: Only the root administrator can attach and detach snapshots. Non-root users with Amazon authentication cannot view or work with snapshots.
FileMaker Cloud uses AWS EC2 snapshots to back up your storage volume. Backups run every twenty minutes, and FileMaker Cloud stores one week's worth (504). Once that limit is reached, FileMaker Cloud deletes older backups in sequence.
Note: If a backup fails, FileMaker Cloud retries the backup in five minutes.
Backup activity is logged in awsmanager.log. Backups do not run if no databases are present.
You can preserve backups. Preserved backups are stored in AWS S3 and will add to your storage size and cost. Preserved backups cannot be auto-deleted by FileMaker Cloud.
Note: When auto-maintenance is enabled on the System Configuration page, the latest backup is preserved nightly before the server restarts.
Viewing and managing backups
In the Backup Summary area:
- Click All Backups to see a list of all backups, preserve backups, and edit backup labels.
- Click Preserved Backups to see the list of preserved backups, edit backup labels, remove a backup from the preserved list, and attach a snapshot.
Backups appear in timestamp order.
In addition to scheduled backups, you can initiate a backup on demand.
To back up on demand, click Back Up Now.
The duration of the backup varies with the data difference of the databases on the data volume. If there is a big difference, the backup takes longer. You must refresh the webpage to see the new backup listed. Backing up on demand also produces a preserved backup.
Editing backup labels
FileMaker Cloud automatically assigns a label to every backup, based on its origin:
- Auto-snapshot backups result from the 20-minute backup schedule.
- Auto-maintenance backups result from the nightly maintenance schedule.
- On-demand backups are initiated by clicking Back Up Now.
You can edit a backup label to identify a specific backup. You can edit labels on either the All Backups or the Preserved Backups tabs. Edited labels appear not only in FileMaker Cloud Admin Console, but also on the Tags tab of the backup snapshot in the AWS EC2 Management Console.
To change a backup label:
- Select one or more backups.
- Click Edit Label.
- In the Change Backup Label dialog box, enter the new name in the New Label field.
Note: If you have more than one backup selected, they all receive the same name.
Enter a label in the Filter Backups by Label box to filter the backups list by an assigned or edited label. To reset the current filter, click Clear Filter.
Working with preserved backups
To preserve a backup:
- On the the All Backups tab, select the backup.
- Click Preserve Backup.
A check mark appears next to the backup in the Preserved column.
You can remove backups that are no longer needed from the preserved list. FileMaker Cloud can then delete these backups.
To remove a backup from the preserved list, on the Preserved Backups tab, select the backup, then choose Undo Preserve.
Working with snapshots
To attach a snapshot:
- On the Preserved Backups tab, select the backup that you want to create a snapshot from.
- Click Attach Snapshot.
- In the Attach Snapshot dialog box, confirm that you want to attach the snapshot.
The attached snapshot appears in the Backup Summary area when the snapshot is complete, and its databases are listed on the right.
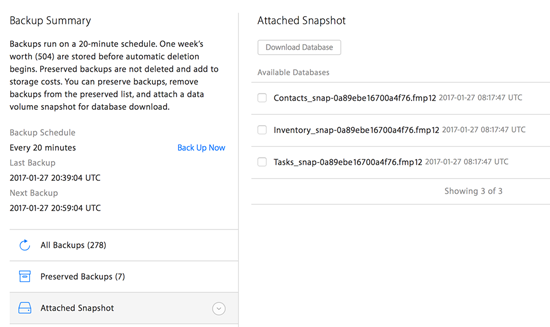
To download a database, select the database you want, and click the Download Database button.
The database is downloaded to your Downloads folder.
You can only have one snapshot at a time. You must detach the current snapshot if you want to attach a different one.
To detach a snapshot, click the down arrow next to the attached snapshot at the bottom of the Backup Summary area.
Configuring FileMaker Cloud
In FileMaker Cloud, click the Configuration tab to configure system settings. The Configuration page has five tabs: System Configuration, Password and Users, Email Notifications, SSL Certificates, and ODBC Sources.
Configuring your instance
You can perform these tasks on your AWS instance:
create a new copy of your instance by clicking Refresh
Note: Refreshing your instance is different from rebooting it in the AWS Management Console. Rebooting your instance is equivalent to an operating system reboot, while Refresh in FileMaker Cloud Admin Console creates a fresh copy of your instance. Configuration settings and data persist after the refresh.
- change your local time zone
- enable or disable auto-maintenance
When auto-maintenance is enabled, the server restarts between 12 midnight and 3 AM (local time) if no users are connected to it. If users are connected, a message is journaled and the server does not restart. Before the server restarts, the latest backup is preserved. This backup is preserved regardless of the success or failure of the auto-maintenance cycle (for example, if user connections prevent the server restart).
Note: If auto-maintenance is disabled, backups are not preserved nightly.
Setting session timeouts
You can set timeouts for FileMaker Go and FileMaker Pro sessions and for FileMaker WebDirect sessions. Changing the session timeout restarts FileMaker WebDirect and disconnects connected users. You can send a message on the Databases tab to warn users.
Managing server plug-ins
Enable FileMaker Script Engine (FMSE) plug-ins to allow plug-ins in client scripts to install and run on FileMaker Cloud. You must also enable the Install Plug-in File script step so it can be performed in connected FileMaker Pro clients.
Note: Only Linux plug-ins are supported.
Managing FileMaker WebDirect plug-ins
Enable FileMaker Web Direct plug-ins so that plug-in files can be used with FileMaker WebDirect solutions. You must also enable the Install Plug-in File script step so it can be used to install, update, and load plug-ins for FileMaker WebDirect.
Changing these plug-in settings restarts FileMaker WebDirect and disconnects connected users. You can send a message on the Databases tab to warn users.
Managing sign-ins and users
In FileMaker Cloud, click Configuration > Password and Users to change your sign-in information and enable other users to sign in.
As the root administrator, you can change your email address and password. You must enter your current password to change your email address. If you forget your password, sign out and click the Forgot your password? link on the Sign In page to reset it.
Setting up Login with Amazon
To allow users to sign in to FileMaker Cloud using their Amazon credentials, set up Login with Amazon. As non-root administrators, these users can perform FileMaker Cloud tasks except for:
- change the root email address and password and configure Login with Amazon on the current tab
- import signed certificates on the Configuration > SSL Certificates tab
- discontinue the FileMaker Cloud subscription on the Subscription > Subscription Center tab
To set up Login with Amazon, you must have an Amazon account. If you already use AWS or Amazon Seller Central, log in with your existing account. Seller Central handles application registration for Login with Amazon.
Note: The application can be a placeholder application. It will be visible to you in Seller Central, but you only need to complete the initial registration.
To set up Login with Amazon:
- Go to Login with Amazon at https://login.amazon.com, then click App Console.
- If you haven’t registered for Login with Amazon, click the Sign up is free link under Not registered?. If you have registered previously, click Sign in to the App Console.
- Click Register new application.
- In the Register Your Application dialog box, enter:
- a name for the application
- a description of the application
- a privacy URL, which can be a placeholder URL
- an optional logo
- Click Save.
An application information page appears.
- Click the Web Settings tab to expand it.
Notice the Client ID and Client Secret fields, which you will copy and paste into FileMaker Cloud.
To set up FileMaker Cloud for Login with Amazon:
- On the Web Settings tab of your Seller Central application, click Edit.
- Sign in to FileMaker Cloud.
On the Configuration > Password and Users tab, follow the onscreen instructions to:
- copy and paste the Return URL fields into your Seller Central application, then save your changes
- copy and paste the Client ID and Client Secret fields from the Seller Central application into FileMaker Cloud
- In FileMaker Cloud, click Save Identity Provider.
Adding an authenticated user to FileMaker Cloud
After setting up Login with Amazon as the identity provider, you can invite users to sign in to FileMaker Cloud using their Amazon credentials.
Note: You must know a user’s Amazon email address to invite them.
To add an Amazon authenticated user:
- On the Configuration > Password and Users tab, click Add Amazon Authenticated User.
- Enter the user's Amazon email address.
The user will receive an email from FileMaker Cloud with an Amazon sign-in link.
- The user clicks the link and signs in to Amazon.
An Authentication Success page appears, with a link to the FileMaker Cloud Sign In page. - The user clicks the link to sign in.
Important:The user should bookmark this link for future use; it contains the URL for the instance.
If any authentication errors appear after the user clicks the Amazon link, check the settings that you copied and pasted between FileMaker Cloud and Seller Central. Also check that you clicked Save in the Seller Central Web Settings page when you pasted the Return URL fields.
Configuring email notifications
Enable Send Email Notifications to receive FileMaker Cloud notifications through email messages in addition to on Admin Console.
You can add other users who will also receive email notifications. When you add users, they receive an Amazon Simple Email Service (SES) Address Verification Request email. After clicking the verification link in the email, the user’s email address is added to the verified list. Each email address is verified only once, and clicking Send Verification for a verified user simply adds their email address to the list.
After you add the first user's email address, the From Email Address field appears, showing that user's email address. Notifications are sent from that address. Additional verified users are subsequently added to the list so that you can choose an alternate "from" email address.
To add a user's email address:
- Click Add Email Address.
- Enter the user's email address and click Send Verification.
- If the user has not been previously verified, wait for confirmation of the verification.
- Click Save.
- Click Edit Email Settings and enable emails for that user.
- Click Save Changes.
Note: You also use Edit Email Settings to delete a user's email address. You cannot delete the current "from" email address.
Managing SSL certificates
FileMaker Cloud initially provides a 90-day trial Secure Socket Layer (SSL) certificate issued by the Comodo certificate authority (CA). You have these options for maintaining an SSL certificate for FileMaker Cloud:
- After 60 days prior to expiration, you can renew a Comodo certificate for the filemaker-cloud.com domain. Renewal is automated through the FileMaker Store.
- You can purchase and register your own domain, and buy a new Comodo certificate for that domain.
- You can purchase and register your own domain, and import your own custom certificate.
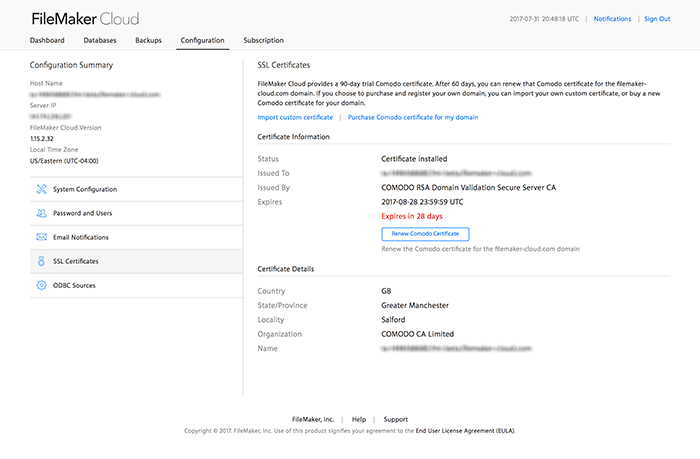
FileMaker Cloud tracks the expiration date of your certificate, regardless of its origin, and displays a daily countdown in red when the certificate expires in fewer than 30 days.
Notes:
- Before renewing your certificate, make sure you have the FileMaker AWS license SKU with the number of User Connections clients you want. To change license SKUs, you must discontinue the current subscription and deploy a new instance.
- If you renew the Comodo certificate and then change license SKUs, you must then purchase another certificate renewal regardless of the initial certificate's duration. Each purchase is the same price and is not refundable.
- Do not perform an instance switchover or make any other instance changes until after a certificate has been imported.
To renew the Comodo certificate for your filemaker-cloud.com domain:
- Click Renew Comodo Certificate.
- Select your country from the drop-down list of billing countries.
If your country is not listed, choose Other. You are redirected to the Comodo FileMaker Security page to purchase a certificate. You must register a domain before purchasing the certificate. - Click Submit to FileMaker Store.
- Follow the steps in FileMaker Store to purchase your renewal.
To buy a new Comodo certificate for your own domain:
- Click Purchase Comodo Certificate for my domain.
- Follow the steps on the Comodo FileMaker Security page to purchase the certificate for your domain.
To import a custom certificate for your own domain:
- Click Import custom certificate.
- In the Import Certificate dialog box, browse to the certificate file location.
- Browse to the certificate key file location.
- Enter the private key password, if one was created when the certificate was generated.
- Click OK.
- If you are using a wildcard SSL certificate, enter the preferred host name for your instance, and click OK.
- Wait to receive an email from FileMaker Cloud.
The email shows the preferred host name and the fully qualified domain name (FQDN) generated by FileMaker Cloud.
When you import a custom certificate, the FileMaker Cloud server restarts. The IP address of your instance might change. In your Domain Name Server (DNS) registration, you can create a Canonical Name (CNAME) record that maps the preferred host name to the FQDN. With the CNAME mapping, if the instance IP address changes, you don't have to update it in the DNS registration. For example:
mycustomhostname.com CNAME fc-jnmwzt-20170322-202817.fmi.filemaker-cloud.com
Concatenating multiple certificates for import
When you import or renew a custom certificate, you might need to concatenate multiple certificates to import as one file. To do so, you create a .pem file, a concatenated certificate container file for SSL certificates.
There are two types of .pem files that you can create and import into FileMaker Cloud:
- a .pem with an entire SSL certificate trust chain (root, intermediate, and primary certificates)
- a .pem with server and intermediate certificates
Creating a .pem file
- Download primary and intermediate certificates. For an entire trust chain, also download the root certificate.
-
In a text editor, paste the entire body of each certificate into one text file.
Important:The certificates must be pasted in this order:
- Primary certificate – your_domain_name.crt
- Intermediate certificate – intermediate_name.crt
- (For an entire trust chain) Root certificate – root_name.crt
- Save the combined file as your_domain_name.pem.
You must include the beginning and end tags on each certificate. The end result will look like the following:
-----BEGIN CERTIFICATE-----
Primary SSL certificate: your_domain_name.crt
-----END CERTIFICATE----- -----BEGIN CERTIFICATE-----
Intermediate certificate: intermediate_name.crt
-----END CERTIFICATE----- -----BEGIN CERTIFICATE-----
(For an entire trust chain) Root certificate: root_name.crt
-----END CERTIFICATE-----
You can now import the file.
Setting up ODBC data sources
In FileMaker Cloud, click Configuration > ODBC Sources to set up ODBC data sources for access by FileMaker Cloud clients. When you add an ODBC data source and choose the driver type, the default port number for that driver is selected. However, you can select any port number from 1 to 65535, except for the reserved ports used by FileMaker Cloud.
Note: To test the ODBC data source connection, you must know the user name and password for the database.
Managing your AWS subscription
In FileMaker Cloud, click the Subscription tab to manage your FileMaker Cloud licenses, subscriptions, and AWS instance settings. You also download logs and databases on this page, which has four tabs: User Connections, Instance Settings, Volume Settings, and Subscription Center.
Managing User Connection licenses
View and work with User Connection licenses on this page.
Before you change a User Connections license SKU in AWS Marketplace, discontinue your current subscription.
Then, go to AWS Marketplace to purchase the SKU with the desired number of licenses, and follow the steps to launch the new instance.
To purchase additional BYOL licenses:
- Click Purchase Licenses.
Wait until the FileMaker Store appears.
- On the Add User Connections to FileMaker Store page, select the number of additional User Connections clients you want (in increments of 5).
- Click Continue.
- You are prompted to enter your license key. If you don’t know your license key, click Where can I find my license key?.
- Click Submit.
- Continue with the FileMaker Store purchase process.
You will receive an email from the FileMaker Store confirming your order. The email contains links to the client software download and license keys.
Note: It can take up to an hour after you receive the email for the licenses to activate on FileMaker Cloud.
FileMaker Cloud sends a notification 30 days before your BYOL license expires, showing the expiration date.
If you do not renew your BYOL license before it expires, FileMaker Cloud sends an expiration notification. Every day that you sign in to FileMaker Cloud after your license expires, you see a dialog box warning that you are out of compliance with the FileMaker End User License Agreement (EULA).
Viewing and changing the instance type
In FileMaker Cloud, click Subscription > Instance Settings to view and change your instance type. FileMaker Cloud supports the types listed. Click Amazon EC2 Instance Types to review the full descriptions on AWS and determine which type best meets your performance and storage needs.
If you change the instance type, you cannot refresh the browser or take any other actions until you receive an email. After you see the email, you can sign in to FileMaker Cloud.
Viewing and changing storage settings
In FileMaker Cloud, click Subscription > Storage Settings to view and increase your data storage volume size. If you increase the storage volume size, you cannot refresh the browser or take any other actions until you receive an email. After you see the email, you can sign in to FileMaker Cloud.
You cannot decrease the data storage volume size. To purchase less storage, you must discontinue your current subscription and purchase a new one.
The default volume size is 40 GB. If you require a very large amount of storage, you might need to increase the volume size incrementally: from 40 GB to 120 GB, from 120 GB to 240 GB, and so on.
Downloading software and logs
In FileMaker Cloud, click Subscription > Subscription Center to download client software and system logs.
- To download licensed software, click the link for your FileMaker Pro client.
- To download one or more logs to your computer, click Select the log to download and then click the log name.
The logs are:
- event.log – all event log data
- gateway.log – gateway server logging
- journal.log – all notifications and user actions
- wpe.log – Web Publishing Engine logging
- fmshelper.log – log file for the utility process that runs and starts and stops all other processes
- awsmanager.log – AWS-related activity, such as instance upgrade or refresh, backups, volume size increase
If you opted in to sending log information to FileMaker, Inc., these logs are sent.
Note: User credentials and database entries are not logged.
Discontinuing your subscription
The Subscription Center displays information about discontinuing your subscription. Carefully review this information before discontinuing your subscription, since this action cannot be undone.
To discontinue your subscription:
- Click Get Instructions to receive an email with instructions.
- Follow the steps in the email to download client software, logs, and databases.
- Return to the Subscription Center and click Delete Stack. (If you change your mind, click Cancel Process.)
- In the Proceed with Deletion dialog box, confirm the root administrator email address and password.
- Click Delete.
Registering your FileMaker Cloud purchase
You can enter your user information and choose the types of data you allow to be sent to FileMaker, Inc.
Note: If you opted in to sending crash data, and if a system crash occurs, the core dump on the root volume for your instance is sent to FileMaker, Inc. The file will be /opt/FileMaker/FileMaker Server/Logs/crash/*.core.
If you clicked I will do this later on the Opt-in Registration page when you first signed in to FileMaker Cloud, you see a notification reminder after 30 days. In the notification, you can click Subscription Center to access this page. If you click Dismiss, the notification goes away and will not reappear.
To enter or change this information:
- Click Edit Settings.
- Make your choices and click Submit.
FileMaker Cloud and AWS considerations
FileMaker Cloud considerations
Consider the following information as you use FileMaker Cloud.
FileMaker clients
- FileMaker Cloud does not support custom FileMaker WebDirect homepages.
- FileMaker Cloud does not support uploading a FileMaker Pro runtime solution.
- The FileMaker Cloud Admin Console always shows time in the host UTC time zone. If you want to use the local time zone, you must include the calculation (the difference between UTC and your time zone) in FileMaker Pro scripts.
- If you create a file in FileMaker Pro 16 and set the Minimum version allowed to open this file option to 16.0 (in the File Options dialog box), you will not be able to open the file in FileMaker Cloud 15. This message is added to event.log: "Database name could not be opened. Database version incompatible; try opening in FileMaker Pro."
- FileMaker Cloud does not support automatic login to a FileMaker Pro file using a specific account and password. If you upload a file and then change the file options in FileMaker Pro to specify an account and password, the file will not subsequently open in FileMaker Cloud.
Administration
- In FileMaker Cloud, the FileMaker Script Engine (FMSE) can only access the Data/Document and Data/Database folders. FMSE is blocked from accessing a localhost port.
- FileMaker Cloud supports up to ten concurrent administrator connections to each instance.
- The following processes will take about ten minutes: FileMaker Cloud upgrade, data volume upgrade, instance type change, and instance refresh. No clients can connect to FileMaker Cloud during this downtime. Administrators should notify users to save their work and disconnect all users before initiating any of these processes.
- When a FileMaker Cloud administrator initiates an instance upgrade, refresh, or restore, they are informed that the process will take about ten minutes and to wait for a success email. However, any other users who are signed in during this time do not see this message. Also during this time, other users can sign in until the server shuts down for restart. After shutdown, they cannot sign in but do not see an explanation message. To prevent potential problems, it is important for the initiator of an instance change to advise any other users who might be signed in.
- If an on-demand backup does not appear in the All Backups list, check the awsmanager.log file for a failure message.
- Occasionally, after a FileMaker Cloud server or instance restart, broken HTML will appear in Admin Console. Refresh your browser to resolve the problem.
Plug-ins and data sources
- Updating a plug-in on FileMaker Cloud does not update the function in FileMaker Pro. You must refresh the FileMaker Cloud instance for the update to take effect.
- If you run a script that includes the Perform Script on Server and Send Mail script steps using a Microsoft SMTP server, you must configure the email service with the FileMaker Cloud public IP address (provided in the EC2 Management Console).
- The
fmsadminCommand Line Interpreter (CLI) commands are not supported in FileMaker Cloud. If you use the Perform Script on Server script step with anfmsadmincommand in your script, you might see FileMaker error code 812, "Exceeded host's capacity." - You cannot establish an ODBC connection if the source name contains extended ASCII characters.
- When you configure an ODBC source with the Microsoft SQL Server driver and a non-default port, you must append the port number to the server IP address (for example:
52.37.11.97,1999).
AWS considerations
Consider the following information as you work with your FileMaker Cloud instance in AWS.
Working with your instance
You perform several instance-related tasks in the AWS EC2 Management Console. For example:
- To reset your password, you look up a value on the Tags tab of the FileMaker data volume.
- To make port changes, you edit inbound and outbound rules for your security groups.
- To name your instance (for easy visibility), you enter a name on the Instances page on the EC2 Dashboard.
You must know the instance ID to work with your instance:
- Find the instance ID in the System Overview on the FileMaker Cloud Admin Console Dashboard, and copy it or write it down.
- In the EC2 Dashboard, click Instances, and search for the instance ID in the search box.
- In the row for your instance, assign a name by hovering over the Name field until a pencil appears. Click the pencil and type the name, then click the check mark to save the name.
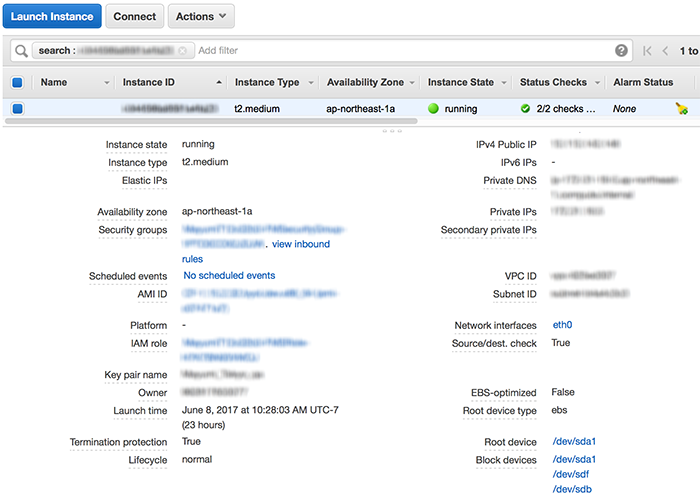
The Description tab provides a summary view of your instance. It shows the public IP address and provides links to your security groups and attached devices (also called volumes).
The attached volumes are:
- dev/sda1 – the root volume, where log data resides
- dev/sdb – the swap volume, used by Linux for processing
- dev/sdf – the FileMaker Data volume
Do not rename any of these volumes, even if the names are blank. In particular, do not rename an instance's FileMaker Data volume, or the instance will become unusable. Instead, use tags to safely keep track of your volumes:
- In the EC2 Dashboard, locate and note your instance ID.
- Under Elastic Block Store, click Volumes, and add a filter for your instance ID (or locate it in the Attachment Information column).
- Select the FileMakerData volume.
- Click the Tags tab for the volume, then click Add/Edit Tags.
- Click Create Tag, enter the key and value names, click Save.
- Click Show Column to see the key added as a column to the volume information.
For example, add a key that identifies the host name for the instance, so you know which instance that FileMaker Data volume is associated with.
About instances
- You receive notifications when your storage volume is nearing capacity. Upgrade the storage volume size after such a notification appears. When the storage volume is full, you cannot upgrade the volume size and you receive a switchover failure message.
- If you forget the host name of your instance, you can sign in using the FileMaker Cloud public IP address (provided in the instance description in the EC2 Management Console). Thereafter, use the URL with the host name and domain name to sign in.
- When a FileMaker Cloud user performs an instance switchover, the instance's name tag in the EC2 Management Console disappears. Go to the instance list in that console and click the pencil to name your instance again, then click the check mark to confirm.
- When a FileMaker Cloud user performs an instance switchover, any security group updates that you made do not carry over. You must reinstate those changes.
- For FileMaker Cloud, in the EC2 Dashboard, instance protection is on by default. This setting prevents an instance from being deleted. If you try to delete its associated stack, you will see an error message. If you disable instance protection and delete the instance, you can then delete the associated stack.
Data snapshots
- If you uploaded several large databases within a short time and see the AWS error "ConcurrentSnapshotLimitExceeded," you have reached the limit of concurrent snapshots you can create on the data volume. In the EC2 Management Console, under Elastic Block Store > Snapshots, review the Status column. Wait for any pending requests to complete, and then check if any snapshots are in an incomplete state (such as Error), as they count against your limit.
Backups will not take place when the snapshot limit is reached for the data volume. When the limit is reached, an exception is logged in awsmanager.log. You have two options:
- In the AWS EC2 Dashboard, under Elastic Block Store (EBS) > Snapshots, delete some snapshots.
- Contact AWS Support and request an increase in your EBS snapshot limit.
Additional considerations
-
FileMaker Cloud does not support use of static IP addresses for cloud computing, known as Elastic IP addresses. If you choose to use an Elastic IP address, be aware that AWS accounts are limited to five Elastic IP addresses per region. In addition, terminating an instance does not remove the association of an Elastic IP address, and AWS imposes an hourly charge if an Elastic IP address is not associated with a running instance.
If you choose to manage your own DNS entries, you can create a DNS A record for your custom domain name that points to the Elastic IP address, but you must still manually disassociate and reassociate the address whenever there is an instance switchover event, such as an instance refresh.
-
FileMaker Cloud requires a default Virtual Private Cloud (VPC) in each AWS region. With a default VPC, an EC2 instance will always be assigned a public ipv4 address, which is required for users to connect to both FileMaker Cloud Admin Console and the Database Server from anywhere on the Internet. AWS accounts created before March 18, 2013, might not be able to launch a default VPC in their chosen region. (Such accounts have "EC2-Classic" attributes, in contrast to "EC2-VPC" attributes.) If your AWS account was created before then, contact AWS Support about enabling a default VPC for your account. For more information, see Default VPC and Default Subnets.
Note: To use your own VPC, see the FileMaker Developer Subscription Software page for an alternative CloudFormation template: FileMaker Developer Subscription. You can then use that template when you deploy FileMaker Cloud.
Troubleshooting
See the FileMaker Knowledge Base answer on common troubleshooting topics: FileMaker Cloud Troubleshooting. You can search for more answers at help.filemaker.com.